Bird Stained Glass Style Laser Cut: A Guide to Flawless Layered Wood Art
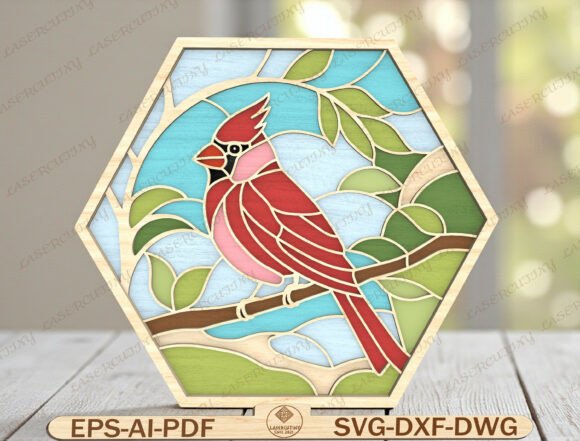
Creating dimensional wall art that mimics the vibrant, fragmented beauty of stained glass requires more than just a sharp laser beam and a stack of plywood. The Bird Stained Glass Style Laser Cut design, particularly featuring iconic subjects like the red cardinal, has surged in popularity among makers and home décor enthusiasts. This aesthetic combines clean, geometric outlines with layered color blocks to produce a striking 3D effect. However, the gap between downloading a digital file and hanging a professional-grade piece on your wall is often wider than beginners anticipate.
Many creators rush into production without fully understanding the nuances of layered vector art. This haste leads to wasted materials, frustrated customers, and projects that lack the intended visual depth. By addressing common pitfalls early, you can ensure your final product honors the intricate design intent. Whether you are crafting a memorial gift, stocking your Etsy shop, or decorating your own cabin, understanding the technical and artistic requirements of this style is essential for success.
Misunderstanding the Digital Nature of the Product
The most immediate mistake occurs before the laser even powers on. It is crucial to recognize that when you purchase a Bird Stained Glass Style Laser Cut template, you are buying a DIGITAL DOWNLOAD. No physical wood, acrylic, or paper will arrive in the mail. This distinction seems obvious, yet it causes significant confusion for new buyers who expect a ready-to-hang item.
This misunderstanding often leads to disappointment if the buyer lacks the necessary equipment or materials. Before purchasing, verify that you have access to a compatible cutting machine. These files are designed for versatility, working seamlessly with popular devices such as the Glowforge, xTool, OMTech, Thunder Laser, and Aeon Laser. They are also compatible with CNC routers and certain cutting plotters like the Cricut (using SVG) or Silhouette (Designer Edition). If you do not own this hardware, you must factor in the cost of outsourcing the cutting or acquiring the machinery before committing to the design.
Overlooking File Compatibility and Preparation
Once you have the files, another frequent error is ignoring the specific format requirements for your machine. The package typically includes high-quality digital files in SVG, DXF, AI, EPS, PDF, and DWG formats. Using the wrong file type can result in poor cut quality, missing nodes, or software crashes.
For instance, importing a complex AI file into a basic laser controller might strip away essential layer information. Conversely, using a low-resolution PNG instead of a vector SVG will result in pixelated edges rather than the crisp, clean lines required for the stained-glass look. Always check the file extension against your software’s preferred input. For Glowforge users, SVG or PDF is usually ideal. For industrial CNC users, DXF or DWG ensures precise toolpath generation. Taking five minutes to verify file integrity saves hours of troubleshooting later.
Neglecting Material Thickness and Layer Alignment
The core appeal of the Bird Stained Glass Style Laser Cut is its dimensional depth. This effect relies entirely on precise layering. A common oversight is using inconsistent material thicknesses. If your base layer is 3mm plywood but your accent layers are 4mm, the alignment pins or glue joints may not fit, causing the entire piece to warp or sit unevenly.
Furthermore, many creators fail to test-fit the layers before gluing. The "stained glass" effect depends on the visible gaps and overlaps between colored sections. If the cuts are too tight, the pieces won’t assemble; if too loose, the structural integrity fails. Always perform a dry fit. Use painter’s tape to hold layers together temporarily to visualize the final look. This step allows you to adjust color choices and ensure the red cardinal’s plumage contrasts correctly with the background hues before permanent adhesion.
Choosing the Wrong Adhesives and Finishes
Even with perfect cuts, poor assembly techniques can ruin the aesthetic. Using excessive glue is a frequent mistake. Visible glue residue disrupts the clean, graphic nature of the design. Instead of squeezing bottles directly onto the wood, apply adhesive with a fine-tip syringe or a toothpick. Clear-drying wood glue or specialized craft adhesives work best, but they must be applied sparingly.
Additionally, neglecting the finish can make a high-effort project look amateur. Raw plywood absorbs moisture and can dull over time. Applying a clear matte sealant or a light stain enhances the wood grain and protects the layers. However, avoid glossy finishes if you want to maintain the authentic, rustic farmhouse or cabin décor vibe. The goal is to highlight the natural texture of the wood while letting the vibrant colors of the bird pop.
Ignoring the Target Audience and Use Case
From a business perspective, failing to align the product with its intended market is a costly error. This design is marketed as perfect for bird lover gifts, nature wall art, and memorial cardinal art. If you are selling these pieces, your photography and descriptions should reflect these emotional connections. A generic photo on a cluttered workbench does not sell the dream of a serene, nature-inspired home.
Present the finished hexagon wall décor in a context that resonates with the buyer. Stage it in a cozy living room, a rustic cabin entryway, or a peaceful office space. Highlight its suitability as a handmade gift project. Understanding that your customer is likely looking for meaning—whether it’s a love for nature or a tribute to a loved one—helps you position the product effectively. This approach transforms a simple wood cutout into a cherished keepsake.
Best Practices for Professional Results
To avoid these common pitfalls and ensure a high-quality outcome, follow these practical steps:
- Verify Equipment Compatibility: Ensure your laser cutter or CNC machine can handle the file formats provided (SVG, DXF, AI, etc.).
- Standardize Materials: Use wood sheets of uniform thickness for all layers to ensure seamless assembly.
- Test Fit First: Assemble the pieces without glue to check for fit and color balance.
- Apply Adhesive Carefully: Use minimal, clear-drying glue applied with precision tools to avoid visible residue.
- Finish Thoughtfully: Seal the wood with a appropriate finish to protect the piece and enhance its visual appeal.
- Contextualize Your Marketing: If selling, use lifestyle photography that highlights the emotional value of the art.
The Bird Stained Glass Style Laser Cut offers a unique opportunity to create sophisticated, layered art that appeals to a wide audience. By paying attention to the details of file preparation, material selection, and assembly technique, you can avoid common mistakes and produce a stunning piece of décor. Whether for personal enjoyment or commercial sale, the effort invested in mastering these nuances pays off in the quality and impact of the final product.