Tiger Wall Art Cut Home Decoration Ideas
There is a distinct power in bringing the wild into our living spaces. Tiger Wall Art Cut Home Decoration offers more than just an image of an animal; it provides a structural narrative that transforms flat surfaces into dynamic focal points. For modern creators, interior designers, and DIY enthusiasts, the appeal lies not only in the majestic subject matter but in the precision engineering required to bring it to life. This form of decor bridges the gap between digital design and tangible craftsmanship, allowing for a level of customization that mass-produced prints simply cannot match.
The rise of accessible fabrication technology has changed how we approach home aesthetics. Laser cutting is quickly becoming the new standard for sampling and producing detailed work in metal, wood, fabric, and acrylic. By utilizing a Laser Cut Wood Wall Art TIGER Svg File, you are tapping into a workflow that values precision, layering, and depth. Whether you are a hobbyist looking to upgrade your living room or a small business owner creating unique inventory, understanding the mechanics behind these multilayer layouts is essential for achieving professional results.
The Power of Multilayer Design
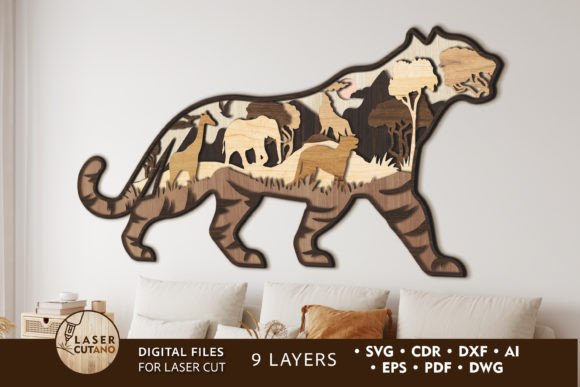
What sets this specific tiger design apart is its complexity. Unlike simple silhouette cutouts, this project utilizes a multilayer layout consisting of nine distinct layers. This approach mimics the natural shading and texture of a tiger’s fur and facial structure through physical depth rather than just ink or paint. Each layer interacts with light and shadow differently, creating a three-dimensional effect that changes as the viewer moves around the room.
When working with TIGER Digital multilayer layout files, it is crucial to understand that these are specially prepared for laser cutters, CNC router machines, and other computer-controlled cutting tools. The files are not merely images; they are vector-based instructions. This means every curve, whisker, and contour is defined by mathematical paths, ensuring that your machine cuts with absolute accuracy. The result is a clean, crisp edge that defines high-quality craftwork.
The creative potential here is vast. You are not limited to a single look. By manipulating the spacing between layers or choosing contrasting materials, you can alter the mood of the piece entirely. A tight assembly creates a sleek, modern profile, while wider spacing between layers introduces dramatic shadows, enhancing the rugged, wild nature of the subject.
Material Selection and Technical Considerations
The success of your Tiger Wall Art Cut Home Decoration depends heavily on material choice. The recommended materials for this template include plywood, MDF, acrylic, plexiglas, metal, cardboard, and paper. Each material brings its own aesthetic and technical challenges.
- Plywood and MDF: These are the most common choices for wood-based wall art. They offer warmth and organic texture. For the best results, use material thicknesses between 3mm and 6mm (approximately 1/8 inch to 1/4 inch). Plywood often reveals beautiful grain patterns on the edges, adding character to each layer.
- Acrylic and Plexiglas: For a contemporary, glossy finish, acrylics are ideal. They reflect light beautifully and can be tinted in various colors. Layering translucent acrylics can create unique color-mixing effects where the layers overlap.
- Metal: If you have access to fiber laser cutting or plasma cutting, metal sheets can create an industrial, durable piece. This is particularly effective for outdoor installations or modern loft-style interiors.
- Paper and Cardboard: These are excellent for prototyping. Before committing to expensive wood or acrylic, create a small-scale model using cardstock to test the assembly order and visual impact.
It is important to note that while you can increase the size of the design to fit larger walls, reducing the size requires caution. The design contains thin elements, such as whiskers and fine fur details. If you scale the project down too much, these delicate parts may become fragile or difficult to weed from the waste material. Always consider the structural integrity of the smallest components when adjusting dimensions.
Versatility for Creators and Businesses
This template is designed to serve a wide range of users, from individual makers to commercial enterprises. The file package includes formats compatible with almost every major design and cutting software: .AI, .SVG, .DXF, .DWG, .CDR, .EPS, and .PDF. This universality ensures that whether you use Adobe Illustrator, CorelDRAW, AutoCAD, or specialized CAM software, you can integrate this design into your workflow seamlessly.
For small business owners and entrepreneurs, this design offers a ready-to-sell product with high perceived value. Handcrafted, layered wall art commands a higher price point than flat prints because of the labor and skill involved. You can differentiate your brand by offering custom finishes, such as hand-painted accents on the wood layers or backlighting with LED strips to highlight the depth of the cut.
Educators and workshop leaders can use this project to teach principles of vector design, material science, and assembly logic. It serves as an excellent case study in how digital files translate to physical objects. Students learn the importance of tolerance—the slight gaps needed between layers to ensure they fit together without forcing—and the artistic impact of layer ordering.
Interior designers can utilize this asset to create bespoke statement pieces for clients. Because the files are editable, you can adjust the color palette of the digital mockups to match a client’s existing decor before production begins. This reduces waste and ensures client satisfaction.
Assembly and Finishing Tips
Creating the finished product requires patience and attention to detail. The final size of the standard layout is 30 x 15 inches, but this can be adjusted. Here are some practical steps to ensure a professional outcome:
- Preparation: After downloading the .zip file, unzip the folder immediately to access all formats. Inspect the vectors in your preferred software. Check for any open paths or overlapping lines that might confuse your cutting machine.
- Cutting: Calibrate your laser or CNC machine for the specific material thickness you have chosen. Test cuts on scrap material are essential to determine the right power and speed settings. You want clean cuts without excessive charring, especially on wood.
- Sanding and Cleaning: Once cut, remove any soot or residue from the edges. Lightly sand the surfaces if you plan to paint or stain the wood. This step ensures that adhesives bond properly and finishes look smooth.
- Layering: Assemble the nine layers in order. Use spacers if you want consistent gaps between layers, or glue them directly together for a flush look. High-quality wood glue or clear epoxy works well for transparent materials.
- Mounting: Consider how the piece will hang. Given the weight of multiple wood or acrylic layers, ensure you use robust mounting hardware. French cleats or heavy-duty picture hanging strips are often reliable choices.
Inspiring Unique Applications
Beyond traditional wall hanging, think creatively about how this laser cut wall decoration design can be applied. Could it serve as a headboard feature in a bedroom? Perhaps it could be adapted into a room divider screen if scaled up and mounted on a frame. For retail spaces, a large-scale version behind a counter can reinforce a brand’s commitment to quality and detail.
You might also experiment with mixed media. Combine the wooden tiger layers with a background of textured fabric or a painted canvas. This juxtaposition of rigid, precise laser cuts against soft, organic backgrounds adds another layer of visual interest. Alternatively, use mirror acrylic for certain layers to create reflections that make the piece feel larger and more immersive.
The key to successful implementation is consistency in your finishing. Whether you choose a natural wood look, a bold monochrome paint job, or a metallic finish, ensure that the treatment is uniform across all layers. Inconsistencies in staining or painting can distract from the intricate geometry of the design.
Ultimately, Tiger Wall Art Cut Home Decoration is a testament to the fusion of technology and artistry. It allows creators to produce sophisticated, gallery-worthy pieces from their own workshops. By leveraging high-quality vector templates and understanding the nuances of material and assembly, you can create decor that is not only visually striking but also deeply personal. Embrace the precision of laser cutting, experiment with textures and scales, and let the bold spirit of the tiger transform your space.